Troubleshooting and Repair Tips - Symptom -
No Heat
If an electric dryer is not actually producing heat, the first thing you will want to check is that it is getting 220V to the terminal block. The safest way to check this is with a voltage pen. You can get them from Home Depot or Lowes. The voltage pen requires no physical contact with the wiring. To check this, follow the dryer cord to the dryer and remove the terminal block cover. Turn the dryer on with the heat setting on. Once the dryer is running, place the voltage pen close to the red wire. If it signals, then that leg is ok. Then place the pen next to the black wire. If it signals, then the dryer is getting what it needs in terms of power, for it to heat. If you choose to use a volt-meter, be very careful. I don't recommend this if you have never done it before. I always wear gloves when doing this. I normally set my voltmeter for the AC setting that is greater than 220 V and check for around 220 volts from the red to black wire when the dryer is running. If the electric dryer is getting 220 volts AC at run-time and still has no heat, the most likely cause is a failed heating element. Heating elements can be measured with an ohm meter. Most heating elements measure between 10 and 50 ohms. However, if the heating element is burned out, you will normally get an infinite ohm reading. This means that your meter will not react when connected to the element. If the heating element is burned out, it will need to be replaced as described below. If not, go to the next step in this guide. Once replaced, you will want to make sure that the dryer has good air flow coming out of the vent - so that the heating element does not prematurely fail.
Some common heating element replacement scenarios are as follows:
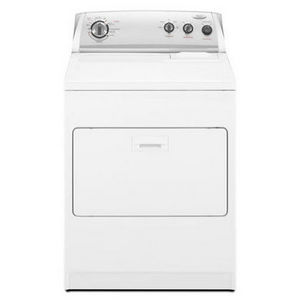
Whirlpool Electric Dryer with lint screen on top right.(heating element part number 279838)
-Unplug dryer.
-Remove vent hose and then the back of the dryer.
-Check the heating element terminals with your ohm meter.
-If bad, remove wires from the element terminals.
-Remove the screws on the left and right of the element.
-Remove the high-limit thermostat from the element.
-Place the high-limit thermostat on the new element
-Place new element in position.
-Insert the two screws on the left and right of the element.
-Replace the connecting wires to the element.
-Replace the back of the dryer.
-Test dryer.
Whirlpool Electric Dryer with lint filter inside door. (heating element part number 3387747)
-Remove access panel at bottom front of dryer either with a putty knife at the top of the panel or by the screws at the bottom of the panel.
-Heating element is on the right. Check the element terminals with your ohm meter.
-If bad, remove the wires at the terminals of the heater.
-Remove the screw that holds the front bracket of the heater housing to the dryer base.
-Remove the screw that holds the front bracket to the heater housing.
-Remove the screw next to the element terminals.
-Use pliers or needle nose vice grips to grab the frame of the element
-Pull the element straight out.
-To replace the new element, reverse the above steps.
Whirlpool Cabrio dryer with lint screen in the door - Model# WED7300XW0
-Unplug the dryer.
-Pop the top open with a putty knife on the right and left sides of the front panel.
-Remove the two screws of the inside front panel holding it to the dryer body.
-Disconnect the door switch.
-Pull the front panel upward to release from the dryer body - and set aside.
-The heaing element is on the left.
-Refer to the pictures below to proceed.
-Test the heating element at the terminals with a multimeter on the Rx1 setting - it should read between 10 and 50 ohms.
-If the element it bad, it will read much higher than 50 ohms - likely infinite (no reading).
-If bad, remove the screws holding the front retainer of the heater housing.
-Lift the heater housing up and pull toward you to release it from the rear duct - being careful not to loose the retaining clip at the back.
-Flip the housing over and remove the screws from the thermal cutoffs.
-Remove the screws that hold the housing together - 4 of them.
-Lift the heating element out and remove the wires.
-Replace with the new element and reasssemble in reverse order.
 Whirlpool Cabrio Dryer Heater Assembly
 Whirlpool Cabrio Dryer Heater Housing Front Removal
 Whirlpool Cabrio Dryer Heater Housing Front Closeup
 Whirlpool Cabrio Dryer Heater Housing Remove from Duct
 Whirlpool Cabrio Dryer Heater Housing Thermal Cutoff Removal
 Whirlpool Cabrio Dryer Heater Housing Disassembly
 Whirlpool Cabrio Dryer Heater Housing PUlled Apart
 Whirlpool Cabrio Dryer Heater Housing Reassembled with New Element
 Whirlpool Cabrio Dryer Initial Temp Reading After Element Replacement
GE Electric Dryer (Common element part number WE11M23 but varies by model)
-Unplug the dryer
-Remove the top by taking out the two screws at the inner top of the door frame.
-Remove the two screws that hold the front of the dryer on. They are visible from the inside top of the dryer and looking down at the door.
-Remove the front of the dryer by pulling the front down and lifting it off of the clips at the bottom.
-Remove the two screws on the front of the dryer frame that holds the two sides to the frame.
-Reach inside and grab the idler assembly (to the left). Spring it back and remove the belt.
-Lift the drum up to release it from the back bearing.
-Pull the drum out.
-The element will be visible - it is at the back of the dryer.
-Test the element at the terminals with your ohm meter.
-If the element is bad, remove the wires to the element terminals.
-Remove the thermal cutoffs from the heater housing. Do not remove the wires from the thermal cutoffs.
-Remove the element by unscrewing the retaining screws holding it to the back of the dryer.
 GE Electric Dryer Front Panel Removal
 GE Electric Dryer Front Top Removal
 GE Electric Dryer Inner Front Panel Screws
 GE Electric Dryer Front Front Frame Screws
 GE Electric Dryer Drum Removal
 GE Electric Dryer Heater Housing
 GE Electric Dryer Idler Assembly
Frigidaire Electric Dryer (most models - Heating element part number varies by model)
-Unplug the dryer
-Remove the top by putting a putty knife between the front of the dryer and the top of the dryer about 3 inches from either side (right and left)
-Remove the two screws that hold the front of the dryer on. They are visible from the inside top of the dryer and looking down at the door.
-Remove the front of the dryer by pulling the front down and lifting it off of the clips at the bottom.
-Reach inside and grab the idler assembly (to the right). Spring it back and remove the belt.
-Lift the drum up to release it from the back bearing.
-Pull the drum out.
-The element will be visible - it is at the back of the dryer.
-Test the element at the terminals with your ohm meter.
-If the element is bad, remove the wires to the element terminals.
-Remove the thermal cutoffs from the heater housing. Do not remove the wires from the thermal cutoffs.
-Remove the element by unscrewing the retaining screws holding it to the back of the dryer.
Maytag Electric Dryer (Heating Element part number LA-1044)
-Pop the top of the dryer off by using a putty knife between the front and top of the dryer about 3 inches from either side of the unit.
-The element is behind the drum in the back of the dryer on the left. It is accessible without removing the drum.
-Test the element at the terminals with your ohm meter.
-If it is bad, remove the wires from the terminals.
-Remove the high limit thermostat from the top right of the element.
-Remove the long screw holding the element in.
-Lift the element out from the left side first, then feed it up through the left.
-Replace with the new element in the reverse order.
|